What is website cache?
Imagine your website is like a library. When a book is popular, the librarian puts it on a display shelf for easy access. This display shelf is like the cache: it holds frequently accessed data so visitors can get what they need quickly.
But what if the book’s content changes or a new edition comes out? The display shelf needs to be updated to reflect the latest version of the book. Clearing the cache is like refreshing that display shelf to ensure it shows the most current information.
How to Purge Litespeed Cache
- Access LiteSpeed Cache:
- Log in to WordPress:
- Go to your WordPress dashboard.
- Navigate to LiteSpeed Cache:
- From the dashboard, select “LiteSpeed Cache” from the menu on the left.
- Log in to WordPress:
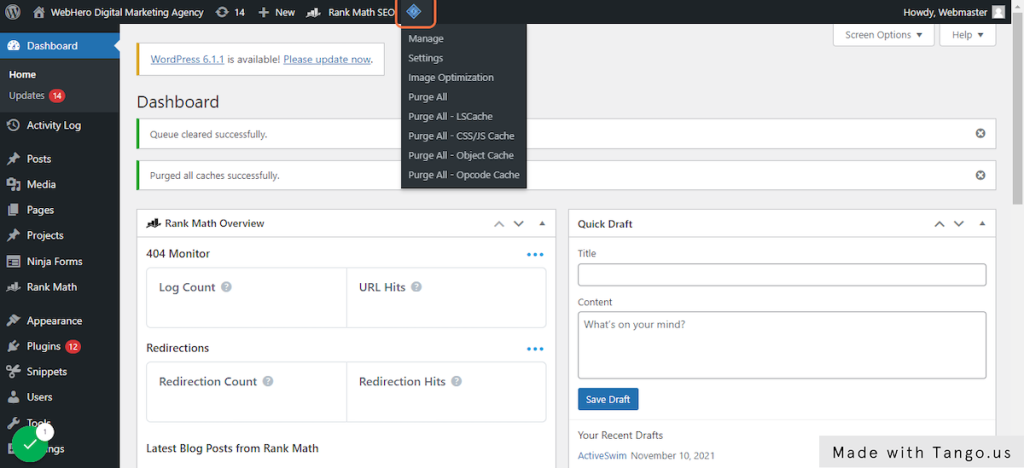
- Purge All Cache:
- Go to Dashboard Tab:
- Click on the “Dashboard” tab within the LiteSpeed Cache menu.
- Purge All:
- Click the “Purge All” button. This will clear all cached content from LiteSpeed.
- Go to Dashboard Tab:

- Purge Specific Cache:
- Navigate to Cache Settings:
- Click on the “Cache” tab in the LiteSpeed Cache menu.
- Purge by Type:
- Use the options available to purge cache for specific content types, such as posts, pages, or categories.
- Navigate to Cache Settings:
- Verify Cache Purge:
- Check Your Site:
- Visit your website to ensure that the cache has been cleared and that you are viewing the most up-to-date content.
- Check Your Site:
- Automate Cache Purging (Optional):
- Configure Cache Settings:
- In the “Cache” tab, configure settings to automatically clear cache based on your preferences or schedule.
- Configure Cache Settings:
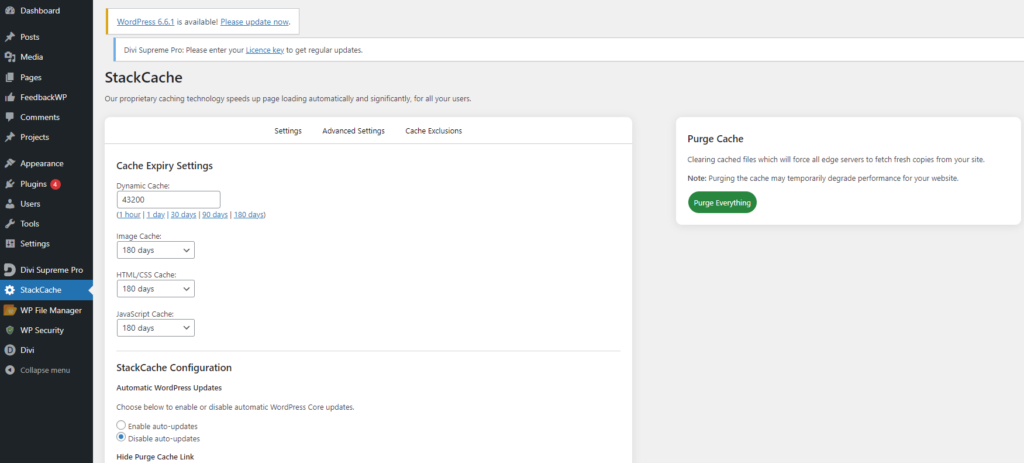
How to Purge Cache
- Access Cache Management:
- Log in to WordPress:
- Go to your WordPress dashboard.
- Log in to WordPress:
- Navigate to Cache Settings:
- Select the Caching Plugin:
- Find and click on the menu item related to your caching plugin, often located in the left sidebar of the WordPress dashboard.
- Select the Caching Plugin:
- Purge All Cache:
- Locate the Purge Option:
- In the caching plugin’s settings or dashboard, look for an option labeled “Purge All,” “Clear All Cache,” or similar.
- Execute the Purge:
- Click the button to clear all cached data from your site.
- Locate the Purge Option:
- Purge Specific Cache (if available):
- Select Specific Items:
- If the plugin provides options to purge specific cache types (like posts, pages, or categories), choose the items you want to clear.
- Confirm Purge:
- Click the appropriate button to clear the selected cache.
- Select Specific Items:
- Verify Cache Purge:
- Check Your Site:
- Visit your website to ensure that the cache has been cleared and you are viewing the latest content.
- Check Your Site:
- Automate Cache Purging (Optional):
- Configure Automatic Purge:
- Explore the plugin’s settings to set up automatic cache clearing based on a schedule or specific triggers to keep your content up-to-date.
- Configure Automatic Purge:
NOTE: Keep in mind that purging cache can temporarily affect the performance of your website, as the cache will need to be rebuilt after it is purged.
If you are having difficulty purging cache using the LiteSpeed Cache plugin, you may want to try clearing your browser cache or disabling any other caching plugins you may be using.